STL containers

std::array

C-style array랑 다른 점

  • 자동 메모리 할당 / 해제
  • 자동 에러 탐지
    • out of range 에러 등등
  • Deep copy 기능 추가
    • 자동으로 deep copy를 사용함.
    • 복사 작업을 피하고 싶다면, reference나 const를 이용해서 추가하면 됨.

사용 예제

1
2
3
4
5
6
7
8
9
10
11
12
13
14
15
16
17
18
19
20
21
22
23
24
25
26
27
28
// Init
std::array<int, 100> arr;
std::array<int, 5> arr1 = {1,2,3,4,5};

// Element access
arr[0] = 10;
std::cout << arr[0] << std::endl;
std::cout << arr1.front() << std::endl;
std::cout << arr1.back() << std::endl;
std::cout << *(arr1.data() + 1) << std::endl;

// Iterator
for (auto it = arr1.begin(); it != arr1.end(); it++)
std::cout << *it << std::endl;

for (const auto elem: arr1)
std::cout << elem << std::endl;

// Exception handling using .at()
try
{
std::cout << arr1.at(6) << std::endl;
}
catch (const std::out_of_range& exception)
{
std::cerr << exception.what() << std::endl;
}


std::vector

std::array랑 다른 점

  • std::array의 고정된 크기랑은 다르게 dynamic한 크기를 가짐.

특징

  • 새로운 데이터 원소를 채워넣는데에는 만큼 소요.
  • sizecapacity를 가지고 있음.
    • size는 실제로 데이터가 채워진 메모리의 양.
    • capacity는 현재 vector에 할당된 메모리의 양.
      • capacity가 다 차게 되면, 2*size만큼 새로 capacity를 할당.
      • 새로 할당된 메모리로 기존의 정보를 모두 이동 (i.e. 복사 이동)
      • 이 경우, 만큼 소요.
  • insert()만큼 소요.

사용 예제

1
2
3
4
5
6
7
8
9
10
11
12
13
14
15
16
17
18
19
20
21
std::vector<int> vec; // 빈 vector
std::vector<int> vec = {1,2,3,4,5};
std::vector<int> vec(10); // 크기가 10인 벡터 선언
std::vector<int> vec(10, 0); // 크기가 10이고 0으로 초기화된 벡터 선언

vec.insert(int.begin(), 0); // 중간에 추가
vec.push_back(10); // 맨뒤에 추가
vec.insert(std::find(vec.begin(), vec.end(), 10), 9); // 10 앞에 9 추가.

std::vector<Image> vecImg;
vecImg.emplace(vecImg.begin()+1, img());
vecImg.emplace_back(img()); // emplace_back()은 push_back()과 다르게 복사 연산이 들어가지 않음. 큰 구조체를 넣을 때 constructor와 함께 사용하면 좋음.

vec.pop_back();
vec.erase(vec.begin()+5); // 6번째 원소 지우기
vec.erase(vec.begin() +2, vec.begin() +4) // 2번째 부터 4번째 원소까지 지우기

vec.clear() // 전부 비우기.
vec.reserve(100) // capacity를 100만큼 할당하기.
vec.shrink_to_fit() // 현재 사용중인 메모리에 효율적이도록 빈 메모리를 해제하기.


std::forward_list

Contiguous data structure의 단점

  • 데이터 중간에 자료를 추가하거나 뺄 때 비효율적.

std::forward_list 특징

  • Linked list 자료구조에 간편한 기능들을 추가한 클래스.
  • 최앞단 원소만 바로 접근 가능.
    • push_front() 또는 insert_after()을 사용해서 으로 추가 가능.
  • remove(x)를 통해 list 내부에 x라는 값을 가진 원소를 모두 없앰.
    • list 내부에 있는 데이터들이 ==operator가 안된다면 컴파일러 에러.
  • remove_if(comp)를 사용해서 list 내부에 comp 함수의 조건을 맞춘 원소를 모두 없앰.
    • 람다 함수를 이용해서 만들면 좋음.
  • remove()remove_if()는 전체를 순회하기 때문에 이 걸림.
  • sort()를 쓸 수 있지만, std::vector 등에서 쓰는 sort와 다름.
    • <operator를 통해 사용하거나 커스텀 cmp 함수를 통해 사용 가능.
    • 만큼 소요됨.
  • reverse()로 순서를 뒤집을 수 있음.

사용 예제

1
2
3
4
5
6
7
8
9
10
11
12
13
14
15
16
17
18
19
20
21
22
23
24
25

std::forward_list<int> lst = {1,2,3};

lst.push_front(0); // {0,1,2,3}
lst.insert_after(lst.begin(), 0); // 맨 처음 원소 뒤에 0 추가. {0,0,1,2,3}

lst.pop_front() // {0,1,2,3}
lst.erase_after(lst.begin()); // {1,2,3}
lst.erase_after{lst.begin() + 1, lst_end()} // {1}

std::forward_list<Image> lstImg;
lst.emplace_front(Image());
lst.emplace_after(lst.begin(),Image());

lst.reverse(); // {3,2,1,0}

std::forward_list<int> lst1 = {0,0,0,0,1,2,3};
lst.unique(); // {0,1,2,3}
lst.unique([](int, a, int b){return (b-a) <2;}); // {}. 특정 원소가 바로 앞 원소보다 2 이상 크지 않으면 삭제.

std::forward_list<int> lst2 = {100, 50, 70, 0, -100};
lst2.sort(); // {-100, 0, 50, 70, 100}
lst2.sort(std::greater<int>()); // {100, 70, 50, 0, -100};


std::list

구현 방법

  • Doubly-linked list
    • 각 node가 이전 node와 다음 node에 대한 포인터 값을 가지고 있음.
  • std::forward_list가 지원하지 못하는 push_back(), emplace_back(), pop_back()을 할 수 있음.
    • 으로 작동함.
  • 기존의 remove(), remove_if(), sort(), unique(), reverse() 등도 사용할 수 있음.
    • 훨씬 편리하기 때문에 대부분의 경우 std::forward_list보다 std::list를 더 많이 사용함.
  • Bidirectional iterator 사용.

사용 예제

1
2
3
4
std::list<int> lst = {1,2,3,4,5};
lst.push_back(6); // {1,2,3,4,5,6}
lst.insert(std::next(list.begin()),0); // {1,0,2,3,4,5,6}
lst.pop_back(); // {1,0,2,3,4,5}


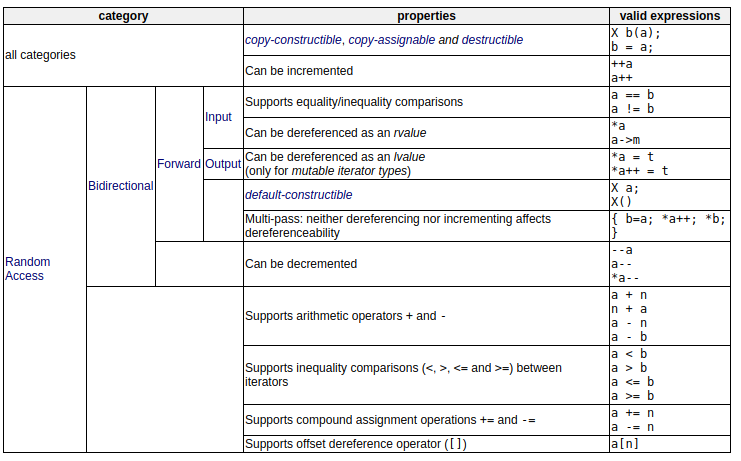
Iterators (simple)

구현

  • 이미지 출처

  • Iterator의 종류는 사용하는 컨테이너에 따라 결정된다.

  • std::vector, std::array는 contiguous data structure이기 때문에 특정 위치의 데이터 원소에 곧바로 접근 가능.
    • Random access iterator
  • std::forward_list는 역방향이 존재하지 않음.
    • Forward iterator
  • std::list는 양방향 움직일 수 있음.
    • Bidirectional iterator
  • advance(), next(), prev()로 움직일 수 있음.
1
2
3
4
5
6
7
8
9
10
11
12
13
14

std::vector<int> vec = {1,2,3,4,5};

auto it = vec.begin();
it += 3;
std::advance(it, -2);
std::cout << *it << std::endl;

std::forward_list<int> lst = {1,2,3,4,5};
auto it lst.begin();
// it += 3; // Error, since std::forward_list does not support random access
std::advance(it, 3);
// std::advance(it, -1); // Error, since std::forward_list does not support backward iteration


std::deque

구현

  • Deque: Double-ended queue 의 약자.
  • 성능:
    • push_front(), pop_front(), push_back(), pop_back()이 모두 작동.
    • Random access도 작동.
    • insert()delete() 작동.
  • 메모리 구조:
    • 크기가 같은 여러개의 메모리 청크를 사용.
    • 이 메모리 청크들의 주소를 연속적인 메모리 구조에 저장.
      • 새로운 메모리 공간을 할당할 때, 기존의 메모리는 그대로 있음.
  • 지원 함수:
    • push_front(), pop_front(), emplace_front()
    • push_back(), pop_back(), emplace_back()
    • insert(), emplace(), delete()
    • erase()
    • shrink_to_fit()
    • capacity()는 지원 안됨!
  • std::vector와는 메모리 할당 방식이 다름.

사용 예제

1
2
3
4
5
6
7
8
9
10
11
12
std::deque<int> deq = {1,2,3,4,5};

deq.push_front(0);
deq_push_back(6);

deq.insert(deq.begin() + 2, 10);

deq.pop_back();
deq.pop_front();

deq.erase(deq.begin() + 1);
deq.erase(deq.begin() + 3, deq.end());


std::stack (container adapter)

구현

  • std::deque를 기본 컨테이너로 사용하여 만든 래퍼 클래스.
    • 원소 저장 공간을 재할당할때 std::vector처럼 전체 원소를 이동할 필요가 없기 때문.
    • 하지만 원한다면 std::stack<int, std::vector<int>>와 같은 형태로 만들 수 있음.
    • std::stack<int, std::list<int>>도 가능.
  • LIFO (Last In First Out) 구조를 가지고 있음.
    • std::deque는 push_front()를 지원…
    • std::stack은 해당 기능을 꺼둠. 왜냐하면 stack은 push_front같은거 지원하지 않기 때문.
  • 모든 연산의 시간 복잡도가


std::queue (container adapter)

구현

  • FIFO (First In First Out) 구조
    • std::queue에서의 push()std::stack에서의 push_back()을 의미
    • std::queue에서의 pop()std::stack에서의 pop_front()를 의미
  • 기본적으로 std::deque를 사용해서 만든 래퍼 클래스.
    • 모든 함수가 으로 사용 가능.

사용 예제

1
2
3
4
5
6
7
std::queue<int> q;
q.push(1);
q.push(2);
q.push(3); // {1,2,3}

q.pop(); // {2,3}
q.push(4); // {2,3,4}


std::priority_queue

구현

  • Priority queue, 또는 Heap이라고도 불림.
  • 가장 작거나 (또는 가장 큰) 원소에 빠르게 접근 할 수 있는 자료구조.
  • 최소/최대 원소에 접근하는데는
  • 원소 삽입/제거는
    • 원소 제거는 최소/최대 원소에 대해서만 가능.
  • std::vector를 기본 컨테이너로 사용해서 구현.
  • 기본적으로 std::less를 사용해서 max heap이 구현되어있음

사용 예제

1
2
3
4
5
6
7
8
9
10
11
12
13
14
15
16
17
18
19
20
21
22
23
24
25
26
27
28
29
30
31
// Creates a max heap
priority_queue <int> pq;
pq.push(5);
pq.push(1);
pq.push(10);
pq.push(30);
pq.push(20);

// One by one extract items from max heap
// 30 20 10 5 1
while (pq.empty() == false)
{
std::cout << pq.top() << " ";
pq.pop();
}

// Creates a min heap
priority_queue <int, vector<int>, greater<int> > pq1;
pq1.push(5);
pq1.push(1);
pq1.push(10);
pq1.push(30);
pq1.push(20);

// One by one extract items from min heap
// 1 5 10 20 30
while (pq1.empty() == false)
{
std::cout << pq1.top() << " ";
pq1.pop();
}